
Typing fast is an essential element for completing your daily computer-related work quickly and efficiently, be it at home or the office. Typing at an average speed with just two or a few fingers is not sufficient. In today’s world of computers and technology, you need to be able to touch type fast and accurately.
What is touch typing?
Touch typing is the subconscious skill where you learn to type with all your fingers, thumbs and without continually looking down at the keyboard, saving you time and guarding against Repetitive Strain Injury (RSI). However, to become an expert in touch typing, you need to master certain techniques.
When touch typing, you need to use all your fingers and thumbs because each key on the keyboard relates to a specific finger or a specific thumb.
QWERTY
All keyboards have a similar design, however in this blog we concentrate on the QWERTY layout (the same layout as a smartphone’s touch keys).
Image – QWERTY Keyboard Layout - kaz-type.com
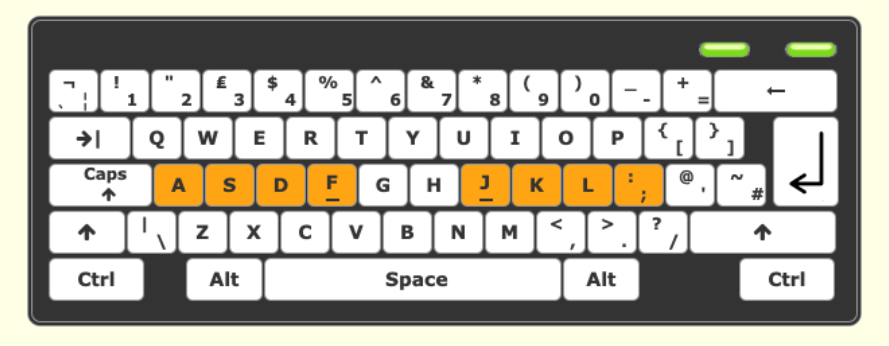
Starting position - ‘Home Position’
The starting position for your fingers when getting ready to touch type, or when they are at rest and not typing is called the ‘home position’ and the keys you place your fingers on are called the ‘home keys’. The ‘home position’ is situated on the middle row of your keyboard as highlighted below.
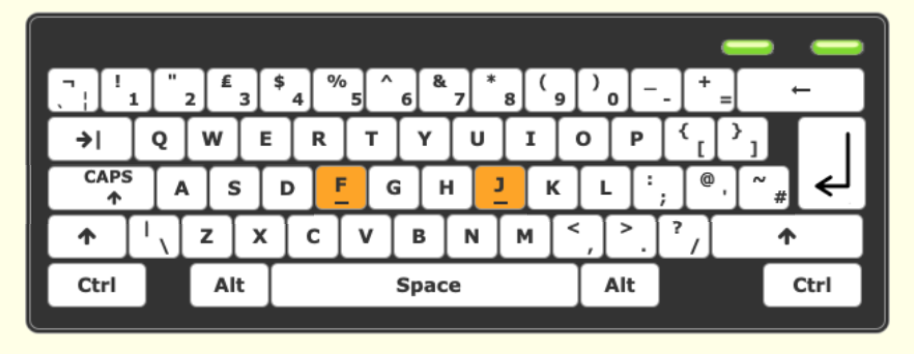
F and J indicators
All keyboards have raised markers (bumps or grooves) on the ‘F’ and ‘J’ keys. These markers are where you should place your index fingers, followed by the rest of your fingers, to form the ‘home position’. The raised bumps and grooves allow you to place your fingers on the ‘F’ and ‘J’ keys by touch, without the need to look down at the keyboard.
Left-hand positioning
Position your index finger on ‘ F’, middle finger on ‘D’, ring finger on ‘S’ and little finger on ‘A’.
Right-hand positioning
Position your index finger on ‘J’, middle finger on ‘K’, ring finger on ‘L’ and little finger on ‘;’ (semicolon).
Position of thumbs
In the case of both hands, your thumbs should rest on the spacebar.
Correct finger positions for the ‘home keys’ on your keyboard
Image – Home Row Keys - kaz-type.com
Memorise the keyboard structure
To learn touch typing, you need to memorize the keyboard layout. There is no need to rush. With regular practice, muscle memory will build and you will quickly get acquainted with the layout of the keyboard.
Remember the association of letters and fingers
Again, with regular practice, you will learn the correct finger positioning for each key and its association with each letter on the keyboard. As muscle memory develops, you will find your fingers will automatically move to the correct keys, allowing you to type quickly. This is known as ‘think-typing’. A good touch typing softwarewill teach you this. Different software use different methods. Several use colour coded keys but KAZ uses a unique Accelerated Learning teaching method and teach the a-z keys using 5 scientifically structured and trademarked phrases. Their method has been tried, tested and proven to work and teach you the a-z keys in just 90 minutes.
Here is a list of which fingers to use to press specific keys
Conclusion
The above are just guidelines to help you become more adept at touch typing but the best touch typing software will take you through each of the steps in order, provide additional information on the importance of correct posture whilst sitting at a computer and explain about the effects, causes, symptoms and preventative measures of Repetitive Strain Injury (RSI).
The KAZ touch typing course uses a unique and proven Accelerated Learning teaching method. Incorporating ‘brain balance’, its 5 scientifically structured and trademarked phrases teach the a-z keys easily and efficiently, in just 90 minutes.
Additionally, it offers structured exercises to develop muscle memory, promoting automaticity and a speed building module, increasing speed and accuracy. The course will help you meet your goal and become a touch typing expert.
Copyright KAZ Type Limited 2025. KAZ is a registered trade mark of KAZ Type Limited.
Developed by : STERNIC Pvt. Ltd.